use an Indy as a diskless network MP3 player
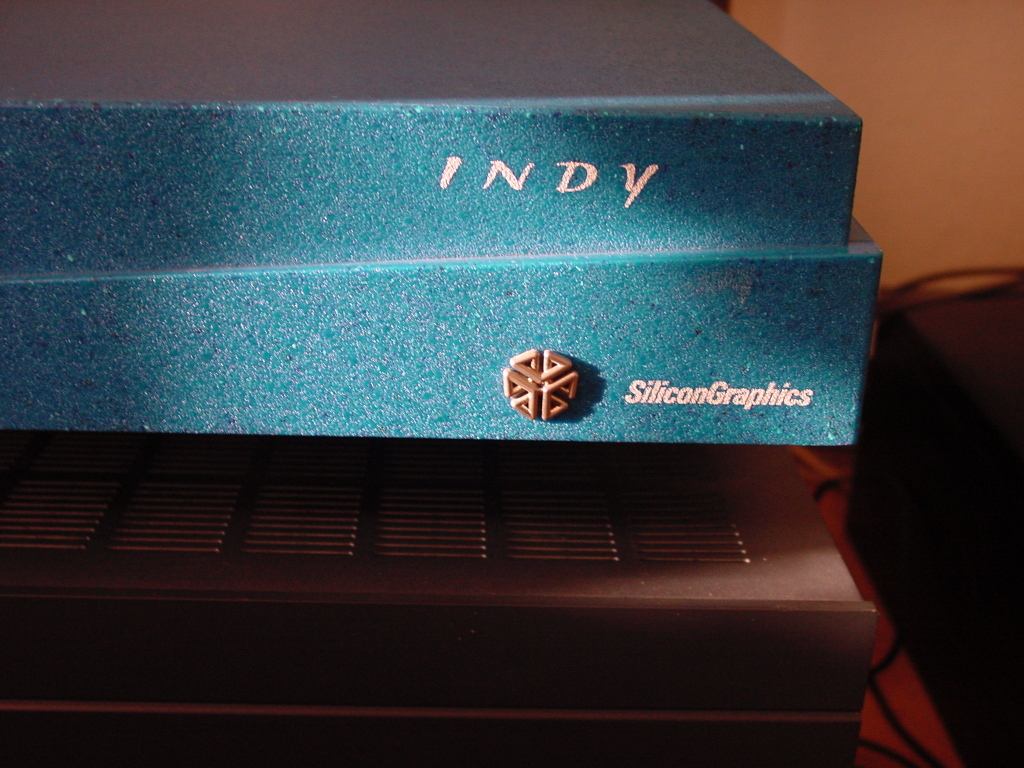
it’s so leet, it started to elevate!
click to enlarge
Actually, this is part two in a series, all because of my recurring obsession with all things Silicon Graphics *^_^*
One and a half years ago, I posted this:
How-to turn an Indy into a dedicated webcam.
And although back then I thought I could’ve very well written the last how-to on this marvelous little machine… It all started to pop into my head again the last few days and so I decided to continue where we left off… The machinery is as obsolete now as it was back then, so no troubles there, right? ^_^
But first of all, why am I doing this?
Well, on a normal day, when I get home from work, I turn on my Media Center, play some MP3s and later on, watch some television. But, the last couple of months I’ve been watching less and less television, something I can recommend to anyone actually, and so my Media Center became (if it already wasn’t) one big bloated box for playing MP3s…
Before Vista, I ran XP Media Center on the same box and even though you could argue it also was bloated (especially for playing MP3s), it didn’t annoy me and guess what? ^_^ Since I run Vista on that machine, it annoys the sh*t out of me, ever more. Now I did have some professional reasons (my dayjob) to run XP Media Center on there first and now Vista, all to gain some experience on these platforms, but I guess I’ve seen enough…
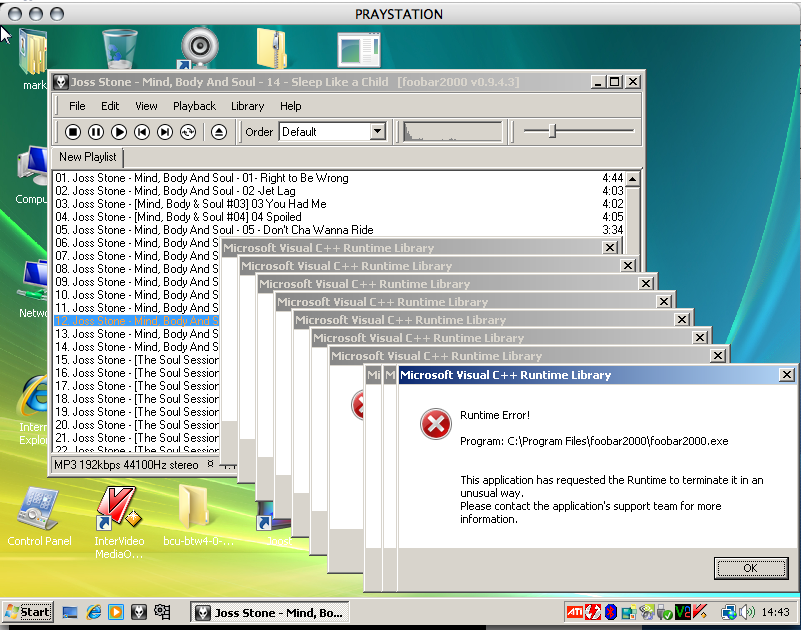
Somehow it seems Vista has a hard time doing anything right. I use a very minimalistic MP3 player, foobar on there and every now and then Vista does what Vista does best and that’s giving you something incomprehensible:
click to enlarge
...this happens quite often btw…
I could probably write a book on my frustrations on Vista but that’s not the point here. Although I guess this was the best dialog so far:
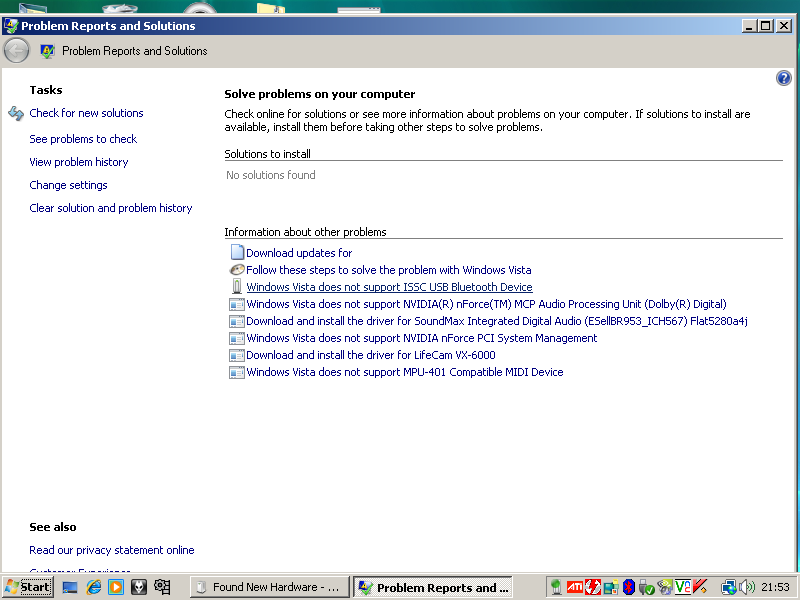
click to enlarge
I reckoned I’d be better off following my own steps from there. If a 2GHz 2GB RAM machine with a 400 watt PSU and the world’s most bloated OS can’t play MP3s properly, it’s time to change ^_^
Now I could wait until I’ve got a 1000 watt 10GHz machine with even more bloated stuff on there *or* go the other way.
Of course, the best would be to grab something like a squeezebox which is like a 4 watt device (and it’s lovely) *but* than I would have to spend a considerable amount of money before I gain anything in for instance power consumption and like all the ‘green’ stuff out there, I have a hard time believing that buying new stuff is the answer to everything. I mean, marketeers want you to believe you actually help the planet by buying a new green car and drive around in that. While I would say that by not buying and therefore not producing it you probably help the planet in a much bigger way. Next to that, it doesn’t matter what car you drive, you never help the planet by driving around in it, okay? ^_^
But you don’t have to go out and buy something new, especially not if your goal is to go pure, minimalistic and make something simply because it’s possible *^_^*
The idea to turn the Indy into a dedicated MP3 player isn’t new. Even not with all the netbooting and such. For the first article I came across this page, which has lots of useful ideas and pointers, two of them being a MP3 player and netbooting the whole thing.
I loved the idea immediately, a completely netbooted Indy, with its root filesystem on my fileserver and outputting the decoded MP3s digitally! If you’re one bit of an audiophile, you don’t want to use DACs inside a computer enclosure, not even when that enclosure says ‘Silicon Graphics’. A computer is good in shifting ones and zeroes and personally I like to leave it at that. It’s also one of the reasons I like SoundStorm so much, because it’s capable of outputting everything digitally (but then we’re talking AC3 and not PCM).
Even though I, at first, wanted to document the whole process of netbooting an Indy, I changed my mind. First of all, of all the things one can do with unix-machines, netbooting is one painful trial and error process, especially the first time around. Now I’m not an expert in netbooting machines, I’ve done it a couple of times and there’s still some trial and error involved so I guess I’m not the best teacher for this. Next to that, it also depends heavily on what you use as a server. In my case that’s my OpenBSD 4.2 fileserver, but the chances are very slim I guess someone reads this who also happens to have an Indy *and* an OpenBSD fileserver.
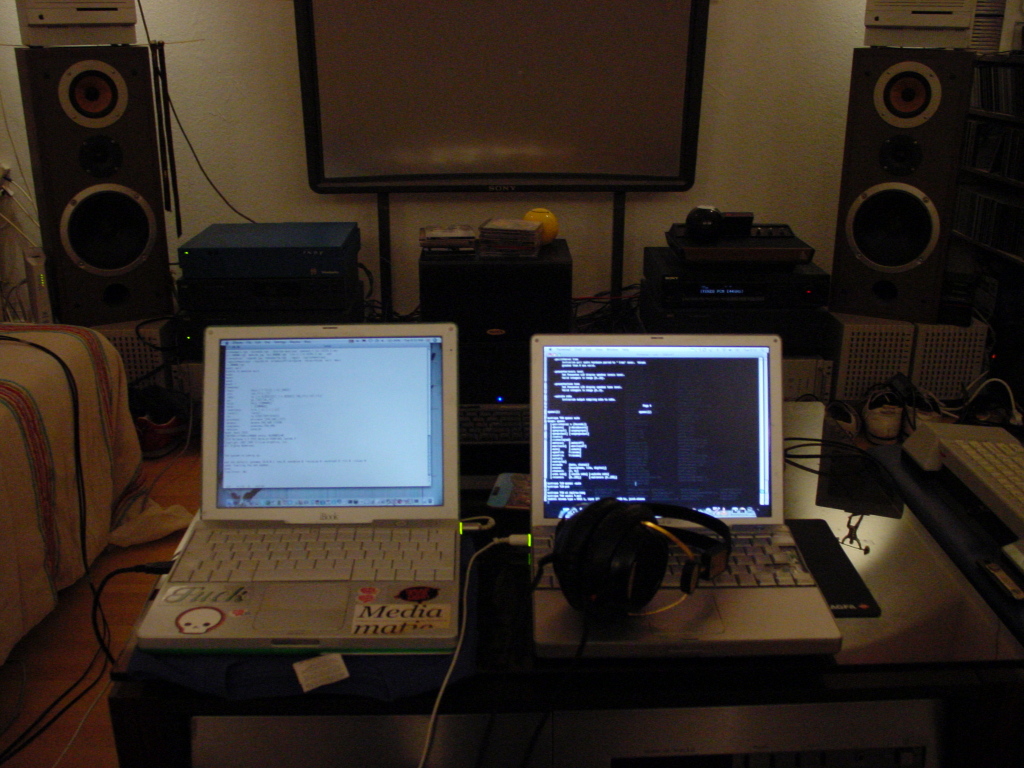
my setup to get this Indy going
serial console on one, SSH on the other
click to enlarge
Still, I couldn’t explain the concept of netbooting better than what ‘man diskless‘ gives me on my fileserver:
“When booting a system over the network, there are three phases of interaction between client and server:
1. The PROM (or stage-1 bootstrap) loads a boot program.
2. The boot program loads a kernel.
3. The kernel does NFS mounts for root and swap.”
So, what I did is this. I tarred and gzipped my root filesystem for the Indy, based on what I did earlier, so that’s IRIX 5.3. And at this moment, you can grab that as a torrent (it’s only 130MB! which is, coincidentally, as large as the driver for my Microsoft VX-6000 webcam (no kidding)):
http://geektechnique.org/media/diskless-indy.tar.gz.torrent
(Before you get your hopes up, I removed all ssh-keys and changed the root password… the root pass now is ‘rootroot’)
(And I’m probably not allowed to seed this, I mean, there will still be a whole bunch of copyrights on IRIX 5.3 and such. But, you also need the best looking dongle before you can use this software and that’s the Indy itself.)
In this file you’ll find three directories,
- diskless-indy/root/
- tftpboot/
- config-files/
The first one is the complete root filesystem I’m using and which is the one getting served to my Indy through NFS. Mind you, this root filesystem is far from perfect yet. This is how far I came with this, this weekend and it should provide everything you need to get something similar going.
Later on, in the update to this project, I posted an update root-filesystem, with a compiled Perl, Audioscrobbler for Last.fm and more sweetness. You can get it here.
The second one is the tftpboot-dir, with a file called ‘unix’ in there, that’s the kernel used for booting. And I made textfiles of all the config-files on my fileserver so you can see how things run at my place and hopefully there are enough pointers in there so you can get your setup running.

my bootprom settings and… success!
click to enlarge
Then, if you need info on how to netboot. I can recommend the following:
.::so you score an indy. now what?
Diskless, Low-Form-Factor OpenBSD Systems
setting up networking in IRIX 5.3 to 6.5
IRIS Development Option (IDO) for IRIX 5.3
and last but not least, the site that connects all SGI hobbyists out there, mostly because of its invaluable forum:
Next to that, go through the man-pages on your server of choice and don’t forget, tcpdump is your friend! (in getting this to work) ^_^
If everything worked out, you’ll have a netbooting Indy, and you can use XAudio for playing MP3s. It’s already installed in/on the root filesystem I provided. Simply ‘cd’ to the directory of choice, in my case I also exported my complete MP3-collection through NFS to the Indy, and ‘xaudio *.mp3’ will play the tunes…
update
I also found working MPG123 binaries for IRIX 5.3 which work on this very installation as well :-)
You can find them at www.planetoid.org/mp3/.
(mirror: mpg123-irix5.3-mips1-static)
By the way, it seemed the swap on NFS did mount at boot, but wasn’t used as swap. To get it to work like it should, I added:
swap -a /swap/swap
to a init script (/init.d/swap). Next to that, the MP3s didn’t mount at boot time either so I added that to a init script too (/init.d/filesystems)
mount 10.0.0.4:/data/mp3 /mp3

playing MP3s from the console
click to enlarge
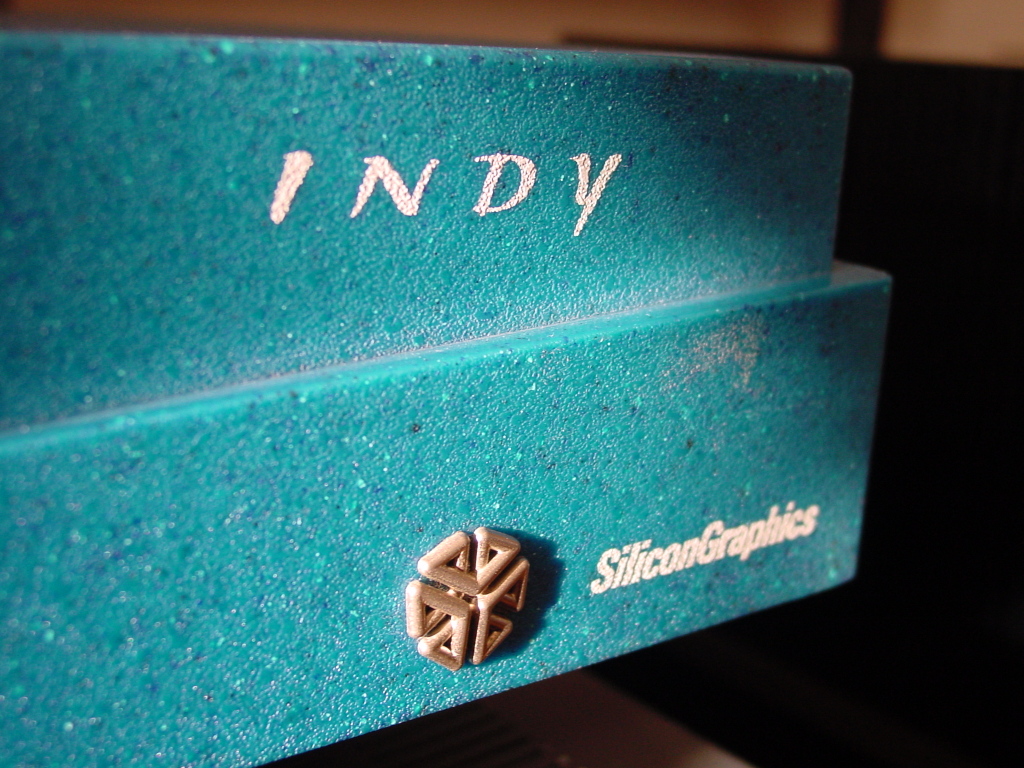
a little dusty, but this golden oldie still has life left in it!
click to enlarge

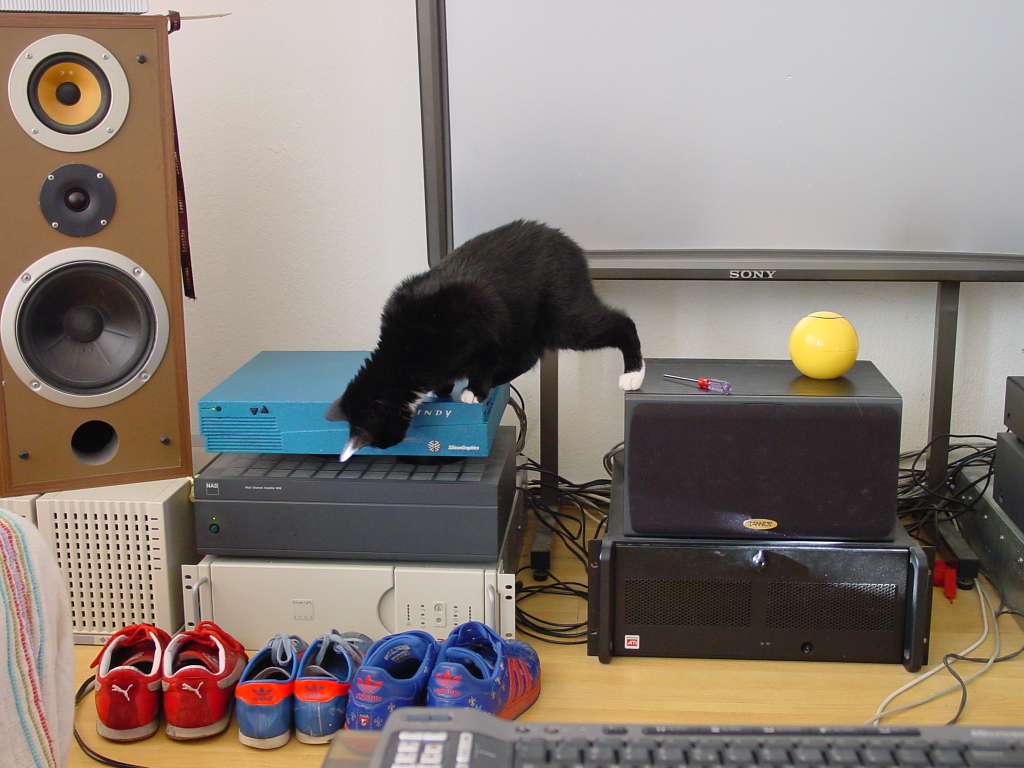
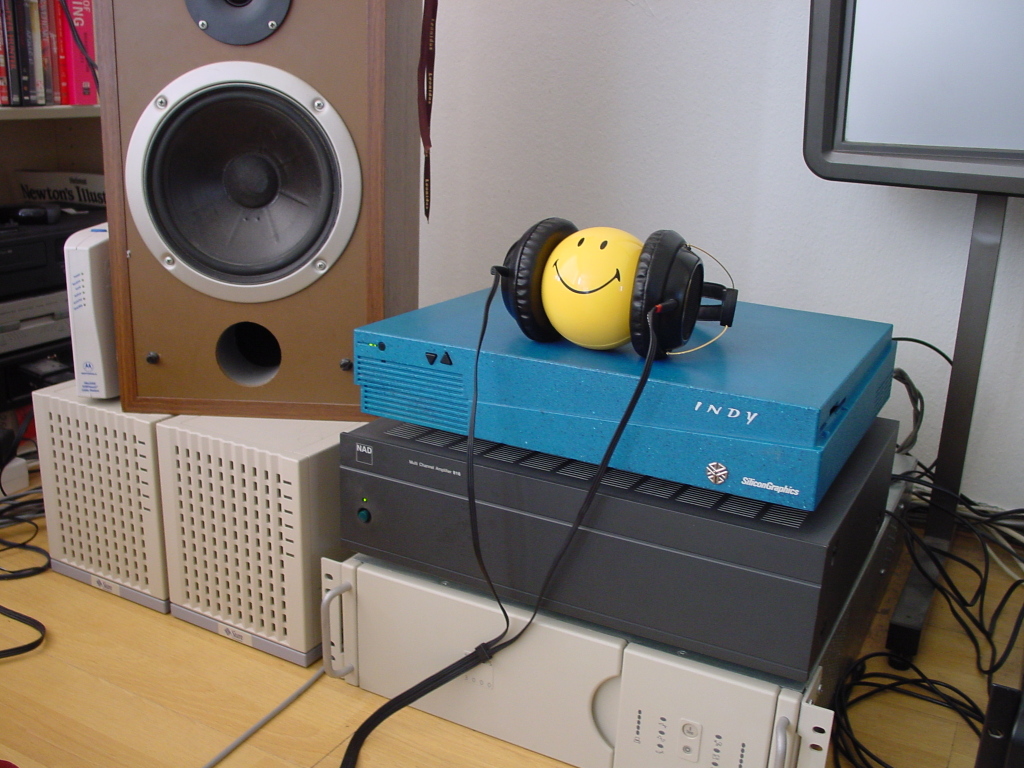
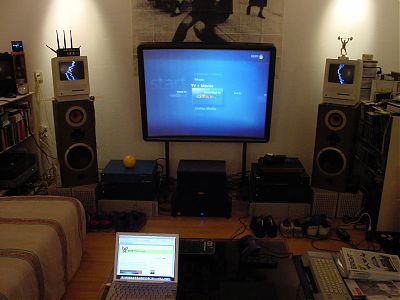
Once the Indy started to shine, it also started to elevate! It now hovers on top of my amp ^_^
Bates couldn’t believe it either.
click to enlarge
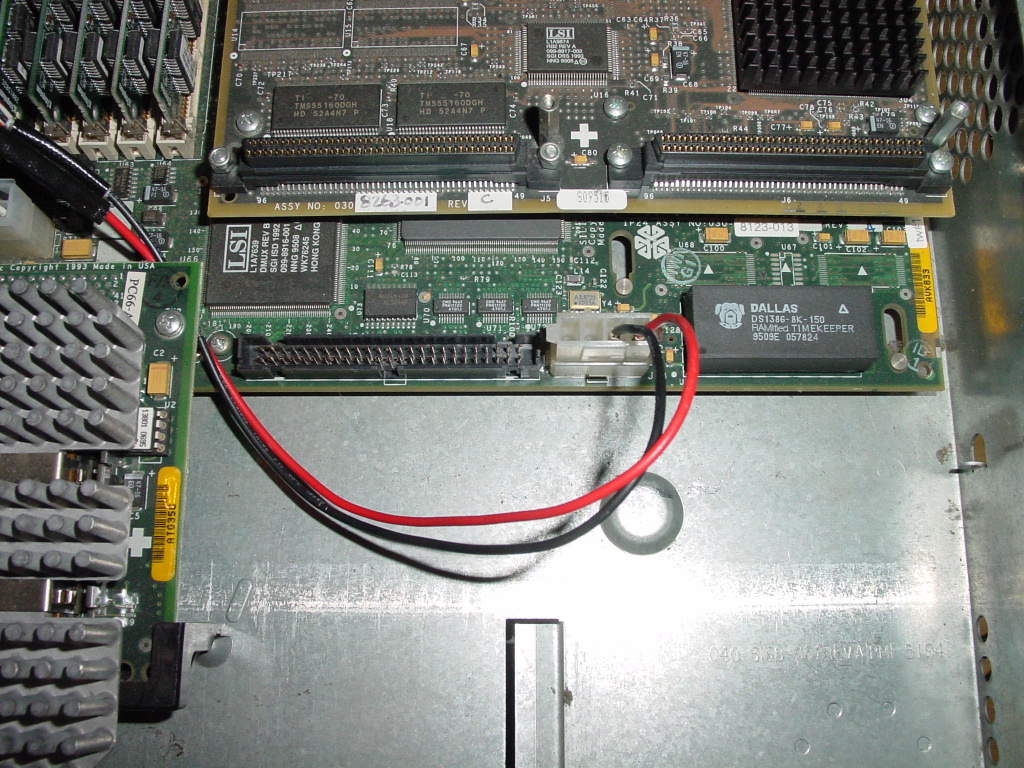
making the correct cable for the Indy
Even though the Indy was introduced in 1993, it came with a proper digital out! You can of course use an analog out, but if you really want some improvement in terms of sound quality over, let’s say, your iPod, I’d really suggest you hook this Indy up to some home cinema amplifier or whatever you (can) use to decode a PCM-encoded digital signal.
The jack used for digital I/O is a normal headphone-jack. You can simply make your own cable to connect it to some coaxial digital in. The tip of the headphone jack is the digital out signal, the sleeve/ground is the ground of the coaxial cable.
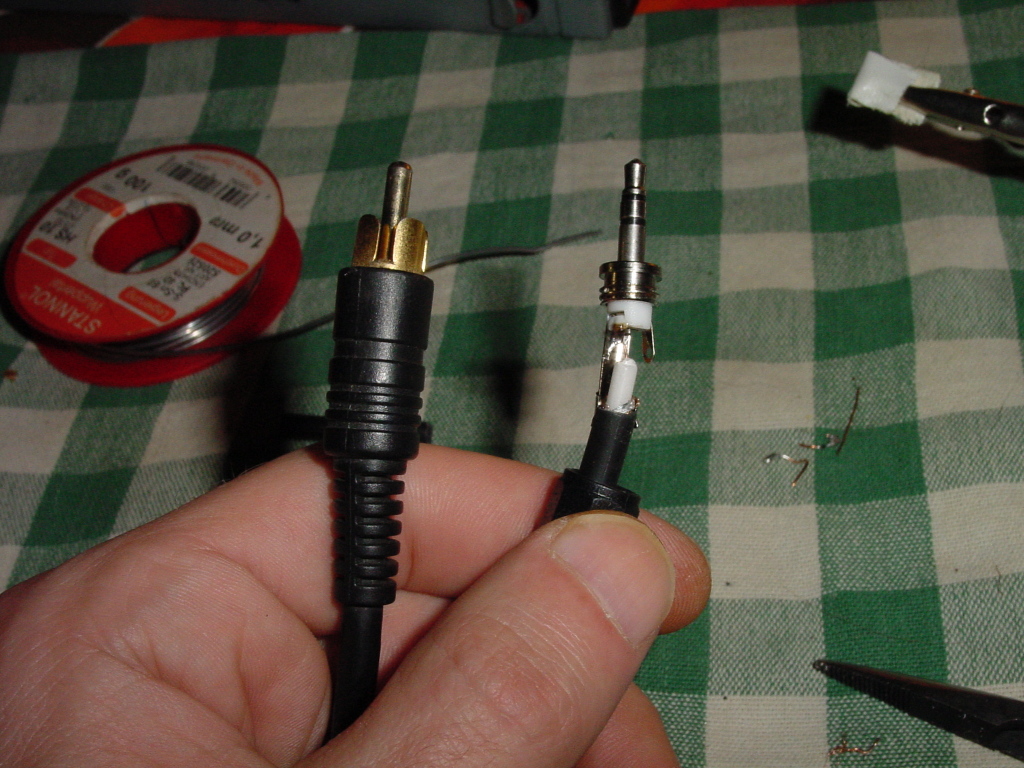
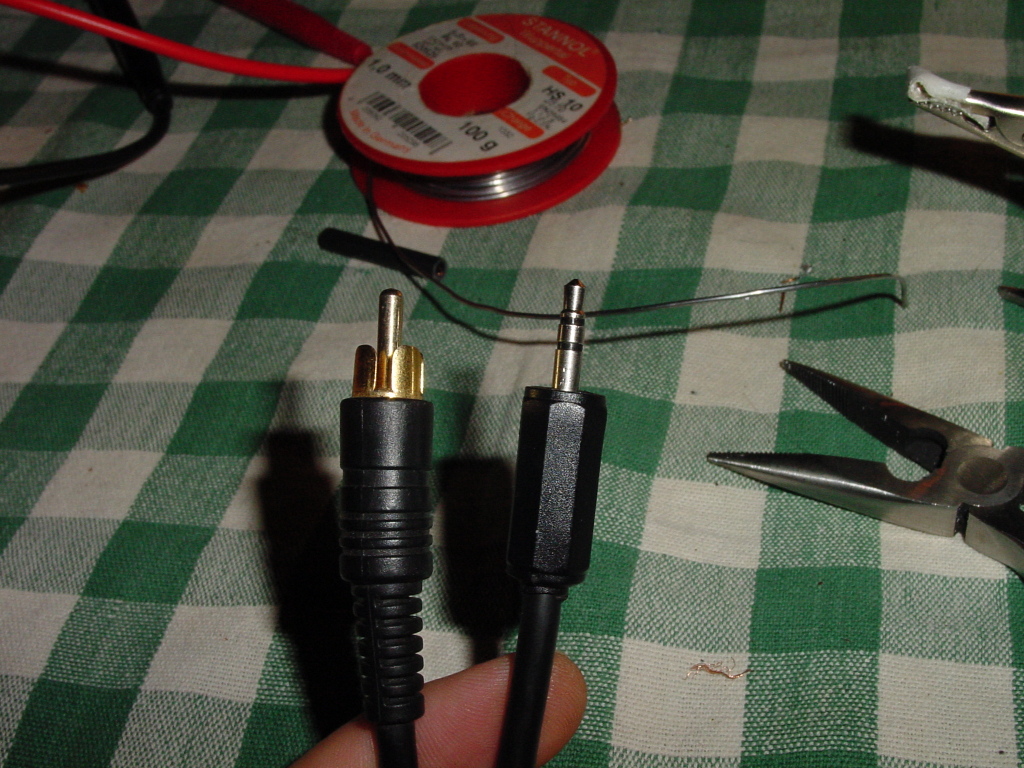
click to enlarge
Once you connect it this way, your audio processor should detect a 2 channel PCM-encoded signal, in either 48 kHz or 44.1 kHz.

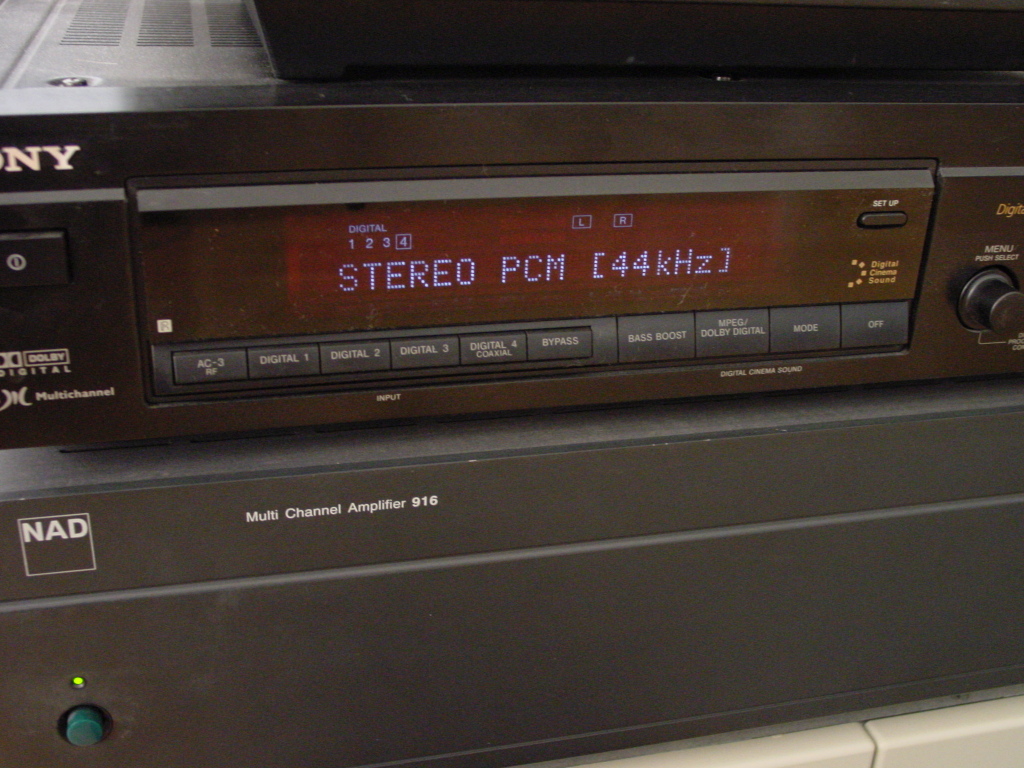
my Sony DSP/DAC recognizes the Indy
click to enlarge
Of course, after all this hard work, it could be I’m having some audiophile disease, which is, after the effort you made, that being spending time and/or (lots of) money, your mind refuses to believe the sound quality is exactly the way it used to be.
In this case however, my goal wasn’t some improvement over my previous setup, but to get rid of all the annoyances and bloat. In other words, I didn’t expect an improvement. Still, from the moment I started listening to the Indy, I was amazed by the quality. Now it could be several things and I would really need to double blind test this and such. I am, however, quite confident that, in terms of sound quality, it is equal if not better than my Media Center.
update
After an evening of listening to different tracks on both my Media Center and this Indy, both connected digitally to my DAC (and I tried to fool myself which was which) and mostly listening on my Stax earspeakers, I can say the sound quality of the Indy is *exactly* the same as my SoundStorm setup (of which I’ve been a fan for years) as long as we’re comparing two channel MP3s of course. I really couldn’t spot one difference in whatever (insert audiophile mumbo jumbo here). Still I have the impression that the Indy sounds better than my Media Center when I’m playing music over my front speakers, but that could be just me. I’m enjoying the Indy much more than my Media Center, that’s for sure. ^_^
I guess it’s fair to say this whole operation succeeded, I’ve now got a (way) less bloated system for listening to MP3s. Next to that, for me it’s much easier to control this Indy from my PowerBook than it is to control my Media Center. In Vista Home Premium there’s no remote desktop and having a choice between VNC to a windows machine or console to a Unix machine, I’d always choose the console. ^_^
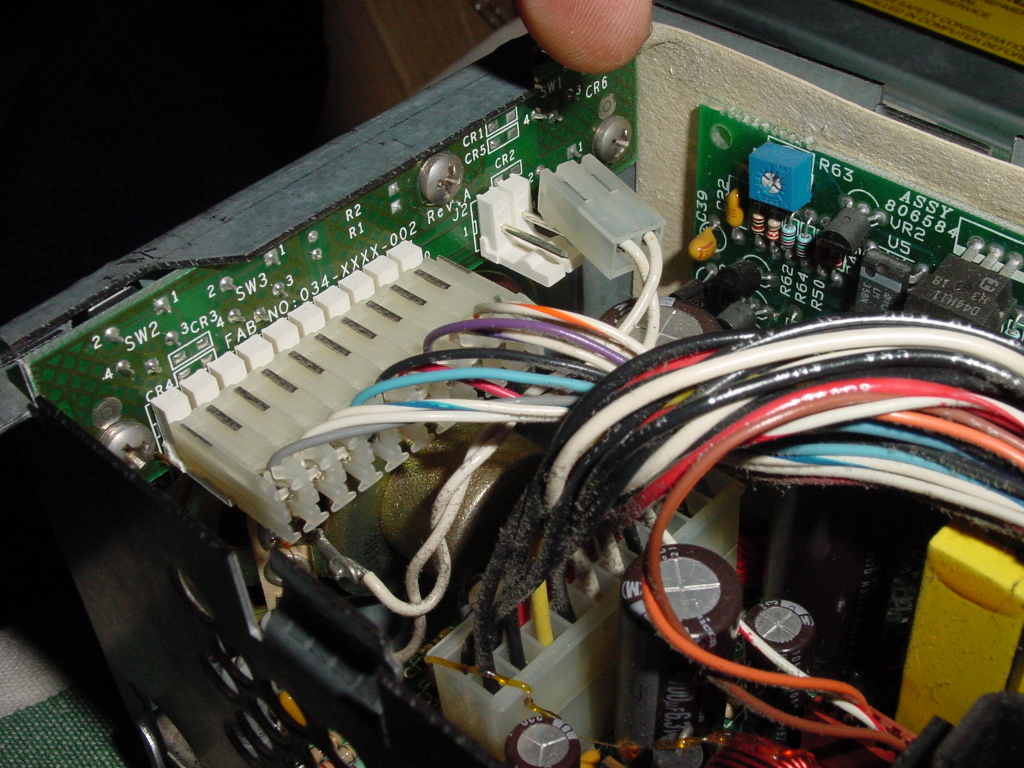
silencing the Indy
Even though we don’t use a (SCSI) disk in this Indy, the fan in the Nidec PSU still makes some noise (if you happen to have a Sony PSU instead of the pictured Nidec here, this operation might not be necessary at all). The Nidec PSU doesn’t make much noise, but still. In the end I decided to let it run on 5 volts instead of 12, so it would, all in all, be the perfect audiophile (imho) network MP3 player.
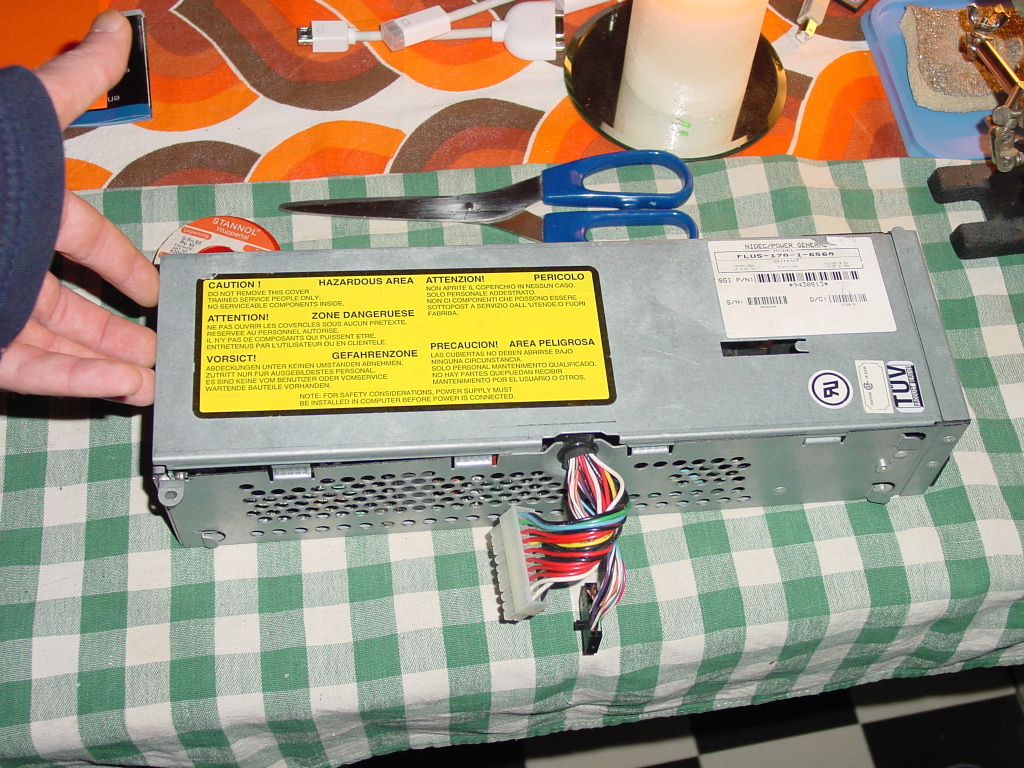
click to enlarge
Once you have the PSU removed, you can open it without having to turn a screw!

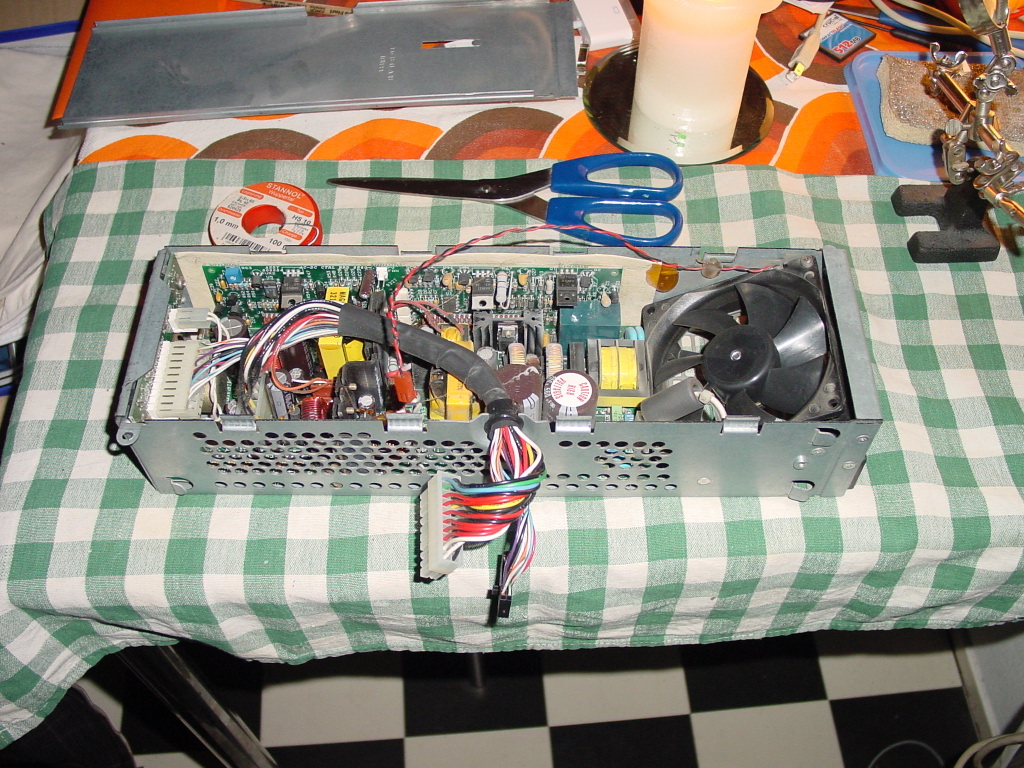
click to enlarge
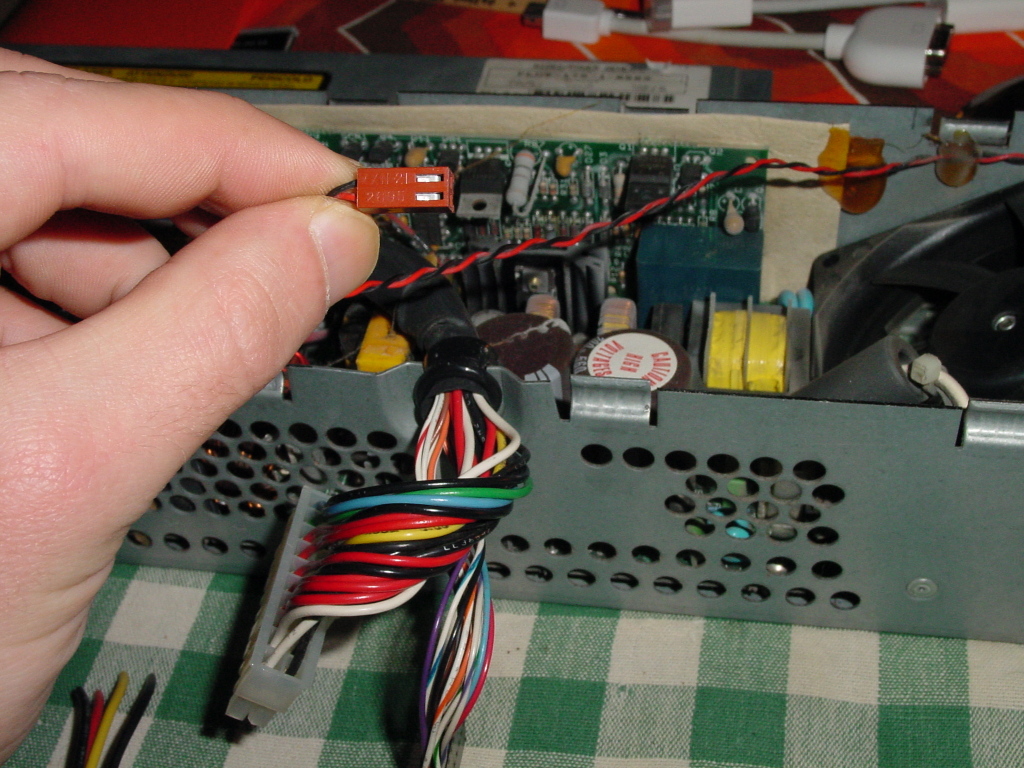
While we’re at it, we can disconnect the onboard speaker as well. You can mute that in software too, but still.
You can lead the power to the fan to the outside.
click to enlarge
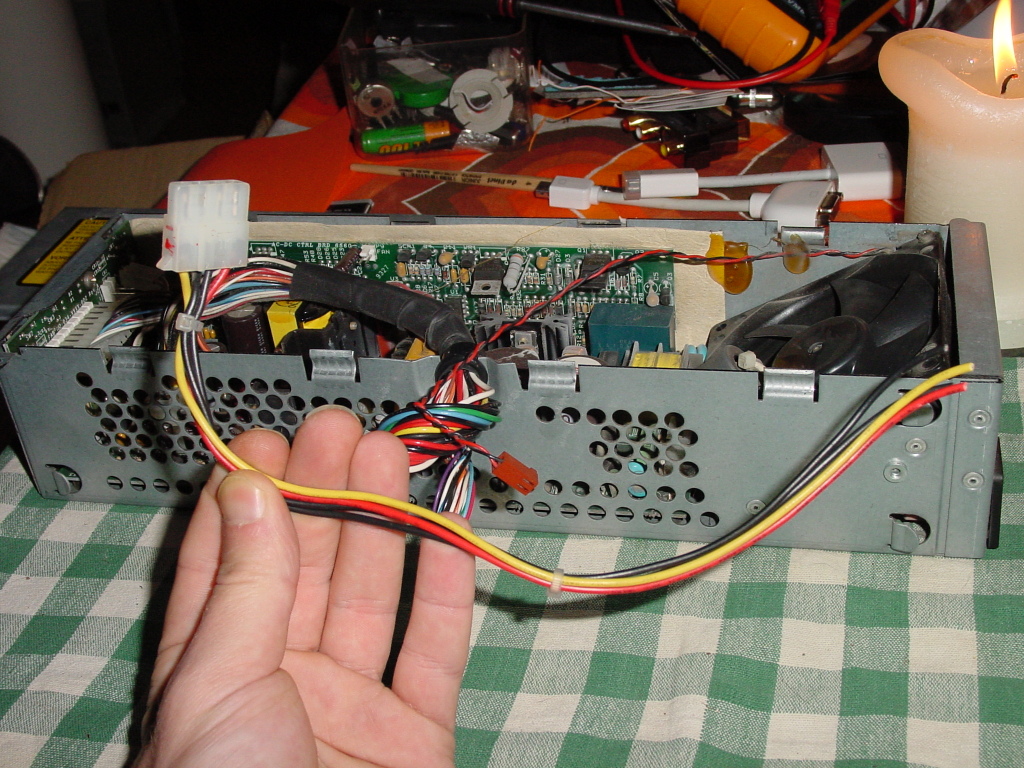
I used a Molex-connector from an old AT-powersupply and removed the 12 volt wires (yellow and black). I connected the red and black wires to the red and black wired of the fan. Even the colour coding is correct!
click to enlarge
Since we’re not using a harddrive anymore, we can connect the Molex which powers the fan to the motherboard.
verdict
Well, I already mentioned the sound quality and after quite some days of work (in a relaxed way) on this, the sound quality is what amazes me most at this point. Now you might happen to know I’ve got some Stax earspeakers and I guess if there would be flaws in any way I would be able to spot them. Luckily it’s a joy to listen to this Indy on my Stax but also on my normal speakers. Even though, in terms of usability it is a rudimentary setup to use, I’m pretty sure this is the setup I will be using from now on.

my Stax earspeakers
click to enlarge

yeah yeah, I’m a happy camper now ^_^
click to enlarge
last but not least

click to enlarge
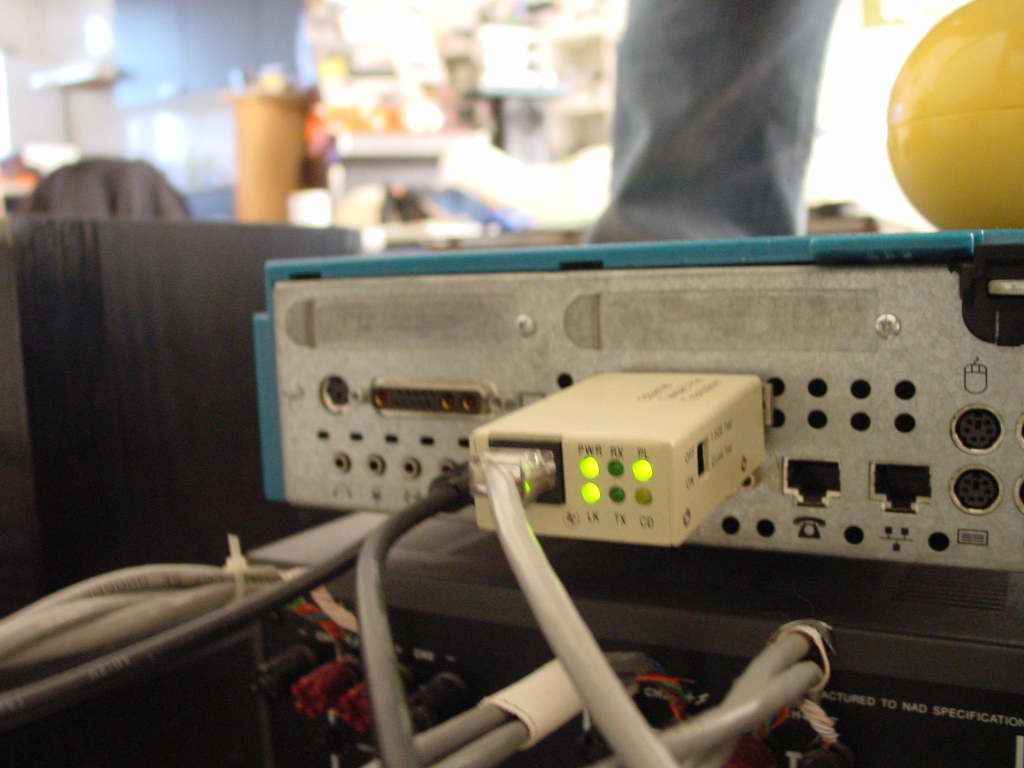
If you like blinking leds as much as I do, you could grab a AUI-UTP transceiver for some additional effects!

even though this is an Indy, you can also connect something else than an Indycam
click to enlarge
Because I used the installation from the previous article as a base, all the webcam snapshot uploading sweetness is still in place.

who needs a display when the only led turns red in case of a kernel panic?
since I properly added the NFS mounted swap, there were no more kernel panics.
click to enlarge
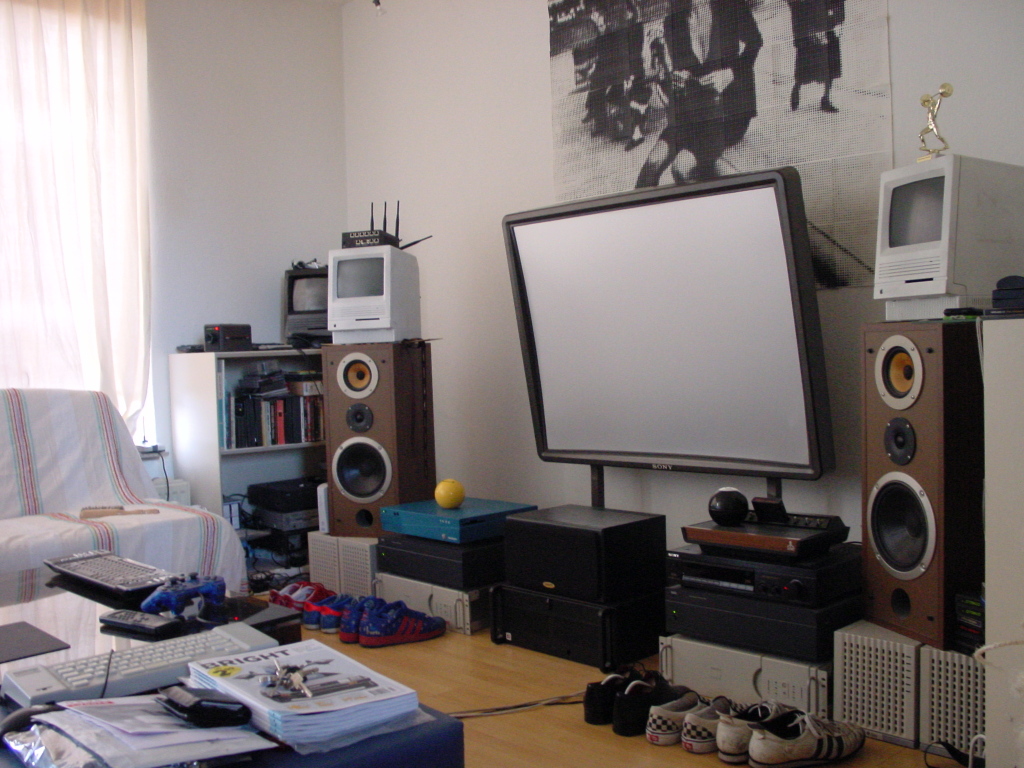
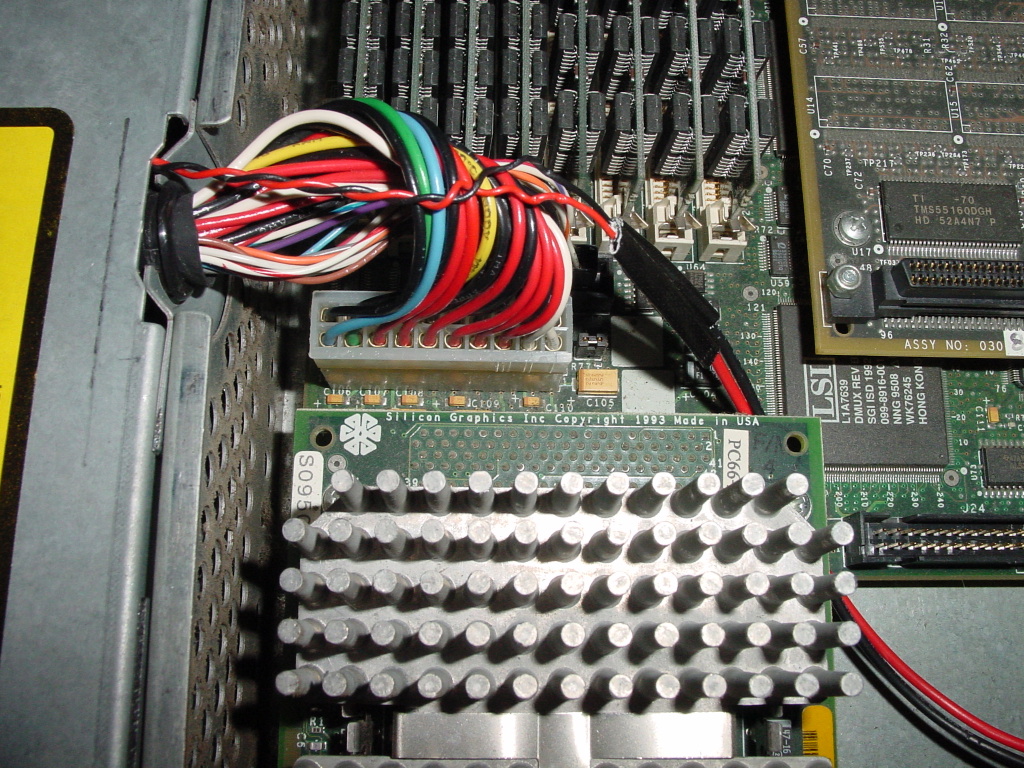
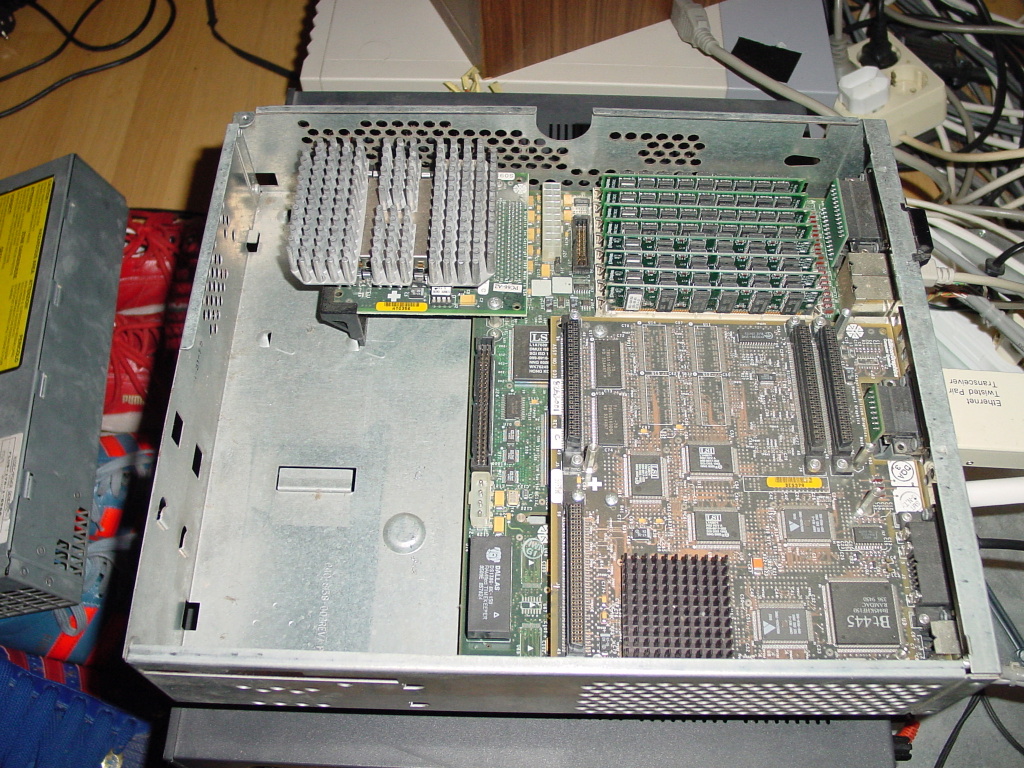
overview
click to enlarge
added
One day later I also connected my Mac Visualizers to the Indy (instead of to my Media Center). Theoretically, from an audiophile PoV this doesn’t make any difference, the visualizers are connected to the headphone jack of the Indy in an analog way (on their own internal DAC inside the Indy) while the audio itself is outputted digitally. The visualizers don’t interfere with the audio quality of the Indy this way and about that, boy, it is a joy to listen to this Indy! ^_^
click to go to the corresponding pic on flickr
earlier on this site:
How-to turn an Indy into a dedicated webcam
ages ago already:
...picking up a SGI Origin 200
...getting to grips with a SGI Origin 200
...getting to grips with a 20 euro SGI Indy
DIY trackback
MAKE:blog
you can find all of my projects overhere


Nice write up! I’ve been looking forward to more about this project since you posted pictures of this on your flickr. This seriously makes me want to get an Indy and give this a try!
I applaud your choice in music, good sir.
Awesome, thats really useful. I recently aquired a Indy for £5 but haven’t been able to use it because i have no clue what the passwords are on the system, and ive had no luck finding a install cd set or iso’s of these disks… Any ideas on how to get in?
Good stuff, I also have a diskless Indy (though it’s running Irix 6.22 booting off a Debian GNU/Linux server). I’d like to point out that some Indy PSUs are silent to begin with… the later Indys came with Sony PSUs with temperature controlled fans. In practice I find the fan is always off on the diskless Indy.
Cool project and all, Sillicon’s are great and what not, but let’s cut to the more important issues here.
What is Bates doing all day long, besides keeping an eye on your projects? On almost every picture, she’s just being…I dunno, a bit passive.
So does Bates actually do any chores around the house, or is her only task to sleep on top of your equipment and scare burglars away with her cuteness?
>Any ideas on how to get in?
You do need access to the PROM for getting it to netboot. You can either get there through a serial connection (like I did this time) or simply by pressing escape if you happen to have a monitor hooked up.
In my previous article I do point to the here used install media (psssst, don’t tell anyone)
>the later Indys came with Sony PSUs with temperature controlled fans.
Right, of course, I changed the text slightly, thanks.
>a bit passive.
Passive? you should see her when she thinks it’s time for some food… ^_^
Very timely read, I’m just abt to move house & was considering finally ditching my Indigo but maybe there’s some mileage in what you’ve done with the Indy for my Indigo. The Indigo has an R3000 CPU so the sw distributions might not be as easy to come by as the R4×00 Indy (& I thk I trashed the IRIX CD’s in my pre-move clearout). It’s not ready for the can yet!
Ah awesome, I just hacked togther a serial cable and have tried to netboot it from a debian machine using the image on the site, by the way thanks a ton for that. Ive been looking for a irix image for years. Kimmo, How did you do this in debian. Ive been trying to the last few minute but i cant seem to get it working. After i boot i get a repeated
“Kernel mount failed, check server, bootparams or press reset button !!!
Get_bootparam failed.”
Im not using bootp because in linux dhcp and bootp interfere with each other. Anyone else done this with normal old linux that could explain their approach?
Oh Alias|wavefront, your old indy2 is still in my house collecting dust.
SGI. I hate your Proprietary monitors…
“Come for the IRIX Vector Icons, Stay for the annoying dongle system”
Cool project, if I could get my hands on an Indy I would be doing the same thing.
I did notice a problem here.
I get an Alert when I access this web page
Alert
550 /robots.txt: No such file or directory
It doesn’t happen on any of your other project pages. Might just be me.
Roland, i got a crimson from a buddy who didnt know the passwords, i took the disk from the machine and mounted in another sgi, a linux box with xfs support should work do, and just manually edited /etc/password. and slapped it back into the machine. unless the prom password is set, its trivial. even then prom resets are easy.
please put it in a magazine p.o box 22 ashaiman 00233 ghana
Thanks for writing this! Encoraged me to play with my Indy again, now netbooting from my Ubuntu server. :D
Here are some more binaries for Irix 5.3: < a href="http://jupiterrise.com/tgcware/">http://jupiterrise.com/tgcware/
These torrents do not work anymore. Does anyone have them? I’m specially interested in the /tftpboot directory.
Vraiment super boulot!